 Ein Track ist eine Liste von Punkten (Koordinaten), denen du in einer festen Reihenfolge folgst. Es zählt nur, dass du eine vorgegebene Strecke wanderst, läufst oder fährst.
 A track is a list of trackpoints (coordinates) that you follow in a fixed order. What counts is that you hike, run or cycle along a predefined track.
Tracks
- Wische von links nach rechts, um zum Hauptmenü zurückzukehren.
- Kopiere deine Tracks (gpx-Dateien) in das Verzeichnis “/lindotrack/tracks” auf deinem Mobiltelefon oder benutze lindoXplore, um durch andere Programme auf dein Telefon heruntergeladene Strecken zu importieren.
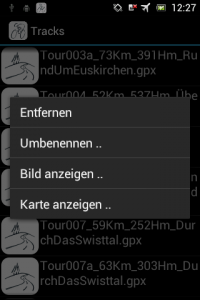
- Klicke lange auf einen Track, um das Kontextmenü zu öffnen.
- Wähle im Kontextmenü “Entfernen”, um einen Track zu löschen.
- Wähle im Kontextmenü “Umbenennen ..”, um einem Track einen neuen Namen zu geben.
- Klicke im Kontextmenü auf “Bild anzeigen ..”, um aus dem Track (und dem zugehörigen Tracklog) ein Bild zu erstellen und dieses in einem Bildbetrachter zu öffnen. Der Track wird von grau (Anfang) bis schwarz (Ende) angezeigt, während dein Tracklog hellgrün (Anfang) bis grün (Ende) angezeigt wird. Die erzeugten Bilder findest du in “/lindotrack/images” auf deinem Gerät.
- Klicke im Kontextmenü auf “Karte anzeigen ..”, um den Track in Google myTracks (oder einer anderen App für den Mime-Type “application/gpx+xml”) zu öffnen.
- Klicke auf einen Track, um diesen zu öffnen und ihm zu folgen.
Tracks
- Swipe from left to right to go back to the main menu.
- Copy your tracks (gpx-files) to the folder “/lindotrack/tracks” on your mobile device or use lindoXplore to import tracks downloaded to your device by other programs.
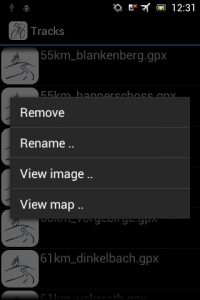
- Long click on a track to open the context menu.
- Select “Remove” in the context menu to delete a track.
- Select “Rename ..” in the context menu to assign a new name to a track.
- Click on “View image ..” in the context menu to create an image of the track (and the related tracklog) and open it in an image viewer. The track will be diplayed from gray (start) to black (end) while your tracklog is drawn from light green (start) to green (end). The images are created in “/lindotrack/images” on your device.
- Click on “View map ..” in the context menu to open the track in Google myTracks (or a different app handling mime-type “application/gpx+xml”).
- Click on a track to open and follow it.
Trackpunkte
- Wische von links nach rechts, um zur Liste der Tracks zurückzukehren.
- Sobald der GPS Sensor deine Position übermittelt, wird das Track-Icon farbig.
- Nachdem du einen Track geöffnet hast, siehst du eine Liste von Streckenpunkten. Der erste Streckenpunkt ist der initiale Zielpunkt. Immer wenn du den Zielpunkt erreichst, wird der nächste Zielpunkt gesetzt und du hörst die Richtung zum neuen Zielpunkt. Eng benachbarte Streckenpunkte werden dabei übersprungen, damit die generelle Richtung früh genug ermittelt wird.
- In regelmäßigen Zeitabständen hörst du die Richtung und die Entfernung zum aktuellen Zielpunkt.
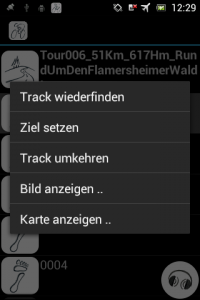
- Klicke lange auf einen Streckenpunkt, um das Kontextmenü zu öffnen.
- Klicke im Kontextmenü auf “Track wiederfinden”, um den nächstgelegenen Streckenpunkt als neuen Zielpunkt zu setzen.
- Wähle im Kontextmenü “Ziel setzen”, um einen bestimmten Wegpunkt als neuen Zielpunkt zu setzen.
- Wähle im Kontextmenü “Track umkehren”, um dem Track in umgekehrter Richtung zu folgen.
- Klicke im Kontextmenü auf “Bild anzeigen ..”, um aus dem Track (und dem zugehörigen Tracklog) ein Bild zu erstellen und dieses in einem Bildbetrachter zu öffnen.
- Klicke im Kontextmenü auf “Karte anzeigen ..”, um den Track in Google myTracks zu öffnen.
- Klicke rechts unten auf das Kopfhörer Symbol, um die Ansagen zu deaktivieren, wenn du sicher bist, auf dem richtigen Weg zu sein oder wenn du bewusst von der Strecke abweichen willst.
Trackpoints
- Swipe from left to right to go back to the list of tracks.
- As soon as the gps sensor provides your position the track icon becomes colored.
- After opening a track you see a list of trackpoints. The first trackpoint is the initial target point. When you reach the target point, the next target point is set and you hear the direction to the new target point. Trackpoints in close neighbourhood will be skipped to calculate the general direction as early as possible.
- In regular time intervals you hear the direction and distance to the current target point.
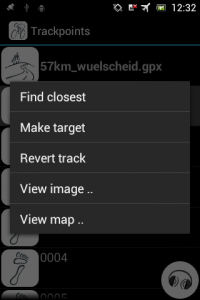
- Long click on a trackpoint to open the context menu.
- Click “Find closest” in the context menu to make the closest trackpoint the new target point.
- Select “Make target” in the context menu to make the selected trackpoint the new target point.
- Select “Revert track” in the context menu to follow the track in opposite direction.
- Click on “View image ..” in the context menu to create an image of the track (and the related tracklog) and open it in an image viewer.
- Click on “View map ..” in the context menu to open the track in Google myTracks.
- Click on the phones icon in the bottom right corner, to deactivate messages if you are sure that you are on the right way or if you want to deviate from the track intentionally.


